Arduino Clock
This is a clock using RTC Tiny with Arduino. Using this we can see time & date.
FOR VIDEO :
THING'S NEEDED
- Arduino UNO R3
- LCD Display (I2C)
- DS 1307 RTC Tiny
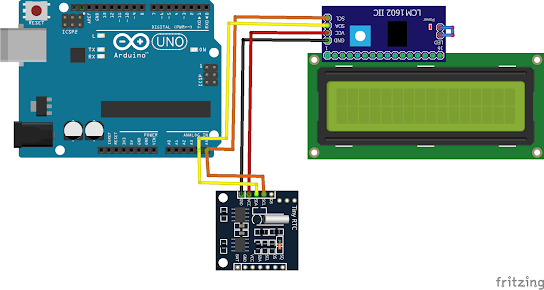
CIRCUIT DIAGRAM
WIRING
RTC TO ARDUINO
- Connect VCC of RTC to 5V of Arduino.
- Connect GND of RTC to GND of Arduino.
- Connect SCL of RTC to A5 of Arduino.
- Connect SDA of RTC to A4 of Arduino.
LCD TO ARDUINO
- Connect the GND of LCD to GND of Arduino.
- Connect the VCC of LCD to 5V of Arduino.
- Connect the SDA of LCD to A4 of Arduino.
- Connect the SCL of LCD to A5 of Arduino.
CODE
#include <Wire.h>
#include "RTClib.h"
#include<LiquidCrystal_I2C.h>
LiquidCrystal_I2C lcd(0x27, 16, 2);
char DayoftheWeek[7][12] = {"SUN", "MON", "TUE", "WED", "THU", "FRI", "SAT"};
RTC_DS1307 rtc;
void setup() {
Serial.begin(9600);
lcd.init();
lcd.backlight();
if (!rtc.begin())
{
lcd.print("Error RTC");
while (1);
}
if (!rtc.isrunning())
{
lcd.print("RTC is not running");
}
rtc.adjust(DateTime(F(__DATE__), F(__TIME__))); // time auto update from computer
// rtc.adjust(DateTime(2019, 12,27, 12,0,0); // year, month, date, hour, minut, second
}
void loop() {
DateTime now = rtc.now(); // get time from rtc
int PM_Hrs;
int AM_Hrs;
int Hour;
PM_Hrs = now.hour() - 12;
AM_Hrs = now.hour();
if (now.hour() < 12){
Hour = AM_Hrs ;
lcd.setCursor(11,0);
lcd.print("AM");
}
if (now.hour() > 12){
Hour = PM_Hrs ;
lcd.setCursor(11,0);
lcd.print("PM");
}
lcd.setCursor(0, 0);
lcd.print(" ");
lcd.print(Hour);
lcd.print(":");
lcd.print(now.minute());
lcd.print(":");
lcd.print(now.second());
lcd.setCursor(0, 1);
lcd.print(" ");
lcd.print(DayoftheWeek[now.dayOfTheWeek()]);
lcd.print(",");
lcd.print(now.day());
lcd.print("/");
lcd.print(now.month());
lcd.print("/");
lcd.print(now.year());
}


Comments
Post a Comment